Image Effects by cecilia
Tricky Text Tips or
Crafty Text Cumshaws or
Astute Text Advice or
I love Playing with my Thesaurus
Tip One: The Glow Worm
The idea is to place "transparent" text over an existing picture.
The text itself is invisible but it has a glow around its' outer
edges.

Because ImageFX versions 3 and 4 handle Text and Alpha buffers
differently, I've done these tutorials for both flavors. If you are
using ImageFX3 go to IFX3-glow
if you have ImageFX4 the tutorial starts immediatly below. Naturally,
you are free to read the entire article no matter which version of
ImageFX you own.
IFX4-glow
- 1.
You can Load up an existing background picture or Create a new
Buffer. Feel free to use the small water gif I've included in the
downloadable file archive text.zip
which you can use to tile into a new image like I did in my examples.
(Create a buffer the size you need, Load the gif as a Brush, FloodFill
with Brush Tile or even Brush Warp on).
 Once you have a Buffer:
- 2.
Create a New Layer.
- 3.
Start the Text Hook and make your text a Brush.
- 4.
Stamp the brush in the New Layer and then give the Layer a blur.
The text hook does a nice job of antialiasing text but some fonts
still need a little more help. Plus, for this effect a nice soft
edge is a good thing.
- 5.
Now we add the glow: Make sure the text layer is selected and Swap
to the Alpha buffer.
- 6.
Make the Edge FeatherIn about 10. and FloodFill the Alpha buffer
with White.

- 7.
Then do a Negative operation. Make sure "Brush" Region is not
selected, if it is, toggle to "Full" Region.
- 8.
Swap back to the RGB buffer.
Now you can play with the BlendModes to pick the one that works
best for the picture. Softlight or Subtract are good to start with.
Subtract will give the text a ghostly look as it seems to float
through the water. Softlight can make the text pop out of the water
but in a very subtle kind of way since the bulk of the letters is
the same as the background. You can also add more Blur or
GaussainBlur to both the RGB and it's Alpha to get the right
etherial look.
script=TransparentGlow.ifx
Naturally, I made a script of this whole mess mostly because once I
figure something out I'm libel to forget how I did it. (I have
ALOT on my mind). For me, macros are really mnemonics! To use it
load up your background picture and run the script. In the text
hook type in your title. For some reason this hook likes to add a
blank line after my last line. If I want my lines centered properly
by the script I Delete this blank line. Keep the toggle at "To
Brush".
As you can see from the illos, I made two lines of one word each.
To make it look better, I shortened the space between the two lines
by changing the Line Space to "-10". You have to be careful how
close you force the text lines together, however, I've noticed that
with some fonts there are these strange artifacts appearing around
the text. Also the Center/Left/Right toggle seems to refer to the
first line of text - not all your lines taken as a whole. Probably
the best method is to run the Text hook before you start the script
so you can experiment with the best look for your text. Then, once
everything is in place, run the script and when the text hook pops
up just click "OK" as everything is already in place.
After you run this script you will notice that the new layer has a
glow around it's border. I happen to like this especially if I
change the Blend Mode to Subtract. But if you don't want it there's
a few things you can do, naturally. One is to simply scale up the
text layer about 10% and Move it around to hide the edges. Or
SwapAlpha and in the Alpha buffer use the FillBox tool to cover all
four edges with black boxes.
Once the script has made all your layers you can do all sorts of extra
stuff. With the text layer on Subtract Mode, I cloned it and changed the
mode of the new layer to Absolute Subtract. This adds a little dark edge
to the text. You can also make the brush, which should still be hanging
around, into a layer. SwapAlpha and fill the letters with black
(FeatherIn 10 should also still be on). SwapAlpha back to the RGB buffer
and the text is now outlined as a glow.
Scroll down or click here for Tip Two: Shadow Text.
IFX3-glow
- 1.
Download the tutorial file archive text.zip.
Load your own background picture or Make a New Buffer and Load the
included water.gif as a Brush, FloodFill with Brush Tile or Brush Warp
on.
- 2.
Make a new layer, Rename it "Glow Layer"
- 3.
Call the Text hook and make a text brush, stamp the brush on new
layer - "Glow Layer" - with at least AntiAliasing on. Blur or
GaussianBlur this layer if needed.
- 4.
IFX3 does it's alpha buffers differently than IFX4 - in version 3
you can't perform a Negative operation on the Alpha buffer directly
- at least not without crashing. Therefore, to get around this
problem, select "Glow Layer" and delete it's Alpha.
- 5.
Then, clone the Layer and Rename it "Text". Change it's Offset to 0
0.
- 6.
Go back to "Glow Layer" and FloodFill with FeatherIN at about 10.
Perform a Negative operation. and make it a MASK.
- 7.
Go to "Text" and change it's BlendMode to SoftLight, Subtract or
anything that you like.
script=TransparentGlow-IFX3.ifx
This script will setup everything for you. It will even ask if you
have a Main Buffer. I think I stole that bit of code from Steve
Chapple. Steal from the best, I say. Of course, if you plan on
using this script in a batch you'll have to comment out that part
and add a few extra items that you may need for your project. And
don't forget to include FlattenLayers before the save operation.
Tip Two: Shadow Text
This one's a doozie. The idea here is to have the text casting a
shadow in front of itself. That means we have to make a text layer,
then duplicate the text layer but flip it over vertically, and pull
in the top half to give it a perspective so it looks like a shadow
of the text falling on the "ground".
If you have ImageFX3 go to IFX3-Shadow
if you have ImageFX4 the tutorial continues below.
IFX4-Shadow
- 1.
Create or Load a background picture. I just Created a blank buffer
and later FloodFilled a gradient in it but you may have a specific
picture in mind. Don't let ME stop you.
- 2.
Use the Text Hook to make your text layer and rename it "Text".
Then Clone this Layer and name that one "Text Reflection".
- 3.
Select the Layer "Text" and [Move Layer] up so the word is near the
top of the buffer. And I don't mean move the Layer's position
relative to other Layers - that's the Menu items Layer Up and Layer
Down. I mean manually change the Offset of the Layer relative to
the "canvas" or the basic position of the background buffer. It's
when you see that
 Hand as it moves the elements of the Layer around. So, turn on the Hand
and move the text up to the top of the page. ok?
Hand as it moves the elements of the Layer around. So, turn on the Hand
and move the text up to the top of the page. ok?
- 4.
The other Text layer - Text_Reflection - needs to be flipped over
Vertically. Remember to Swap to Alpha and do your flipping there
because the "mask" for the text is only in the Alpha channel.
- 5.
Now it's time to add a little perspective rotation to this layer.
You can use the "Perspective 3D Rotate" in Transform. I think a
Rotation of about 50 degrees on the "X" axis is fine.
- 6-a.
Swap the Alpha and you can [Move Layer]
to a
more appropriate place under the original letters so it looks like a
reflection. You may also find that it needs to be scaled up just a
little (say about 10%). You can Undo the last perspective operation and
run in again. Scaling is one of the abilities in 3D Rotate so increase
the scale in both x and y the same amount. Or just run the normal Scale
operator.
- or 6-b.
Instead of 3D Perspective you can instead use the new Distorter Hook.
Again, this operation must be done on the Alpha channel. You can move
the Grid right on the buffer. Just make sure that Y1 and Y2 end up with
the same values or the reflection wont have a straight line at it's top
edge. And keep "Alpha" at "Ignore".
- 7.
Swap back to Main buffer.
- 8.
Add a New Layer - named "FadeAway" - and move it [Layer Down] to
just above the Background Layer. Here's a subtle little touch that
should help make the reflected text have a more shadowy feel. That
is, the farthest part of the shadow is less intense and this new
Layer will do this for us. We are going to FloodFill this Layer
with a black to white gradient.
- 9.
Go to the Palette and toggle on Range 8. This selects the first two
color registers - which in the default palette, as you know, are the
colors we want.
- 10.
Return to the Toolbox and click on the FloodFill tool. Change the
fill to Vertical and the Range to "R8".
- 11.
After you have filled the Layer, perform a Negative operation. Then
in the Layers Manager make this layer a MASK. Scale this layer so
the Height is halved while the width is left the same. [Move Layer]
down so it covers the second half of the buffer. It's
only supposed to affect the reflected text layer.
I've arranged my Layers in this
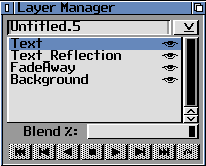 order, just to get you orientated. But it's only important that the
FadwAway Layer is somewhere under the Text Reflection Layer. It doesn't
have to be directly under.
order, just to get you orientated. But it's only important that the
FadwAway Layer is somewhere under the Text Reflection Layer. It doesn't
have to be directly under.
If you came here from IFX3, you can now Return.
If you are reading the IFX4 version, it continues:
Here is where you can really get creative. The "Text Reflection"
layer can have Blend Modes like hardlight or darken or even
colorize. You can Clone the "Text" Layer and [Layer Down] so it's
under the "Text" Layer. This is to make a more typical text shadow.
Change its' offset so it's just slightly off from the original Text
layer. Then change the Blend Mode to hardlight. Now you'll have two
shadows cast from this text. Strange but possible.
Script=ShadowText.ifx
The script will make all your basic layers but once done you'll
have to go in and Move them with the Hand
individually. Which is why I name all my layers.
IFX3-Shadow
- 1.
Load or Create Buffer
- 2.
Start the Text hook and type in some letters.
- 3.
In the Layer Manager Menu, choose [New Layer From Brush]. Move
Layer
up to the top half of buffer.
- 4.
The Brush should still be the selected Region at this point. Do a
Vertical operation on the brush. [Transform/Flip Vertical].
- 5.
Now start [Perspective 3D Rotate]. Rotate X can be about 50,
uncheck "Lock Scale" and if you wish increase Scale x and y both
about 10. This really depends on the font you are using.
- 6.
Perform another [New Layer From Brush]. This will be the reflected
text layer. Move Layer
to bottom half of buffer.
- 7.
Open the Alpha Menu and [Copy To Alpha]. The Transform operations
did something "bad" to the original alpha channel and we want it
back, thank you.
Do the FadeAway operations. Then come
back here.
Having Returned from the "FadeAway" layer, let's continue:
Tips on the Tip:
Using this sort of gradient fill can also be used on a text layer
to tint it gradually. That is: have a text layer, above that the
gradient mask layer and above that a layer with an image or single
color. The Mask Layer will allow the top layer to gradually show
through on to the Text Layer. This is a simple example, naturally.
But the only thing stopping you from having multiple Mask layers is
the amount of your RAM.
Script=ShadowText-IFX3.ifx
Follow along and when the script has stopped, Move the Layers with the Hand.
The reflected text layer can have Blend Modes like hardlight or darken
or colorize, whatever works for you. Did we have fun? I know I did.
We'll do this again next time. Same Bat-Time, same Bat-channel.
The complete contents of this site are
unless otherwise indicated.
The contents may not be reproduced in whole or part, in any form, without prior written consent from
cecilia. You have been warned ;)
Need help with this topic? Email
Me